Before You Start
- Fully inspect each mural panel for possible defects.
- It's easier if the mural is installed by at least two people.
- Do not trim panels before installation.
- Each mural panel has approximate 0.5" overlap.
- Be sure to properly prep the wall prior to beginning project
Materials Needed:
- Level and pencil (optional)
- Ladder
- Dropcloths
- Wallpaper trays x2
- Non-paper tape
- Sponge and/or Smoothing Brush
- Wallpaper paste activator (optional)
- Seam roller (optional)
- Sharp Cutting Tool (optional)
- Straight Edge (optional)
Step 1 - Prepare Your Wall
The wall surface should be clean, dry, structurally sound and free of mildew, grease, or other stains, and free of irregularities in order to achieve the best hanging performance and complete removal when redecorating.
To apply on drywall. For best results, apply to a wall surface that has been painted with one coat of builder’s primer and one coat of latex paint (note: this is typical of new construction; a wall surface that has been painted with a single coat of primer or a coat of satin or gloss paint is acceptable). The wall surface should be clean, smooth, and free of debris or contaminants.
To apply over paint. Painted walls should be primed, smooth, and free from debris. Check the wall surface to determine the condition of the paint adhesion. If the paint is old, damaged, or flaking, priming is highly recommended.
To apply to a wall previously covered with wall paper. Any old wall paper remaining should be removed as well as the old adhesive (remove by sanding or using adhesive remover). Primer should be applied to the wall surface that is clean, smooth, and free of the old adhesive.
To apply over paneling. Any grooves should be filled to achieve a smooth surface, then covered with an adhesion-promoting primer.
To apply to a wall currently covered with wall paper. Not recommended.
Step 2 - Prepare work area
Arrange clean drop cloths against wall to catch water drips. Panels will be saturated during installation and will be dripping water. Panels will also need to be laid out on a clean surface to prepare the adhesive so we recommend a new or clean drop cloth.
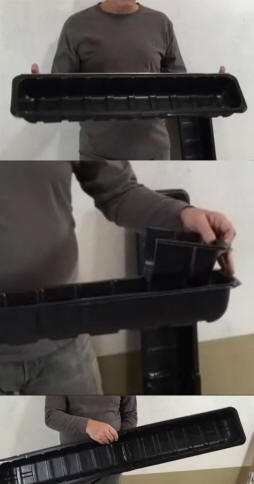
Splice together 2 matching wallpaper trays of 30-32” inches (commonly found in hardware stores) by cutting one end off of each tray, and taping them together to make a contiguous elongated tray. Fill tray 3/4 full with water.
Alternately, spray-on wallpaper paste activator can be used instead of dipping the panels in water.
Step 3 - Make Guideline (optional)
Make a level guideline on the wall as you would when hanging a picture frame or poster. Use this as a starting point for the first panel.
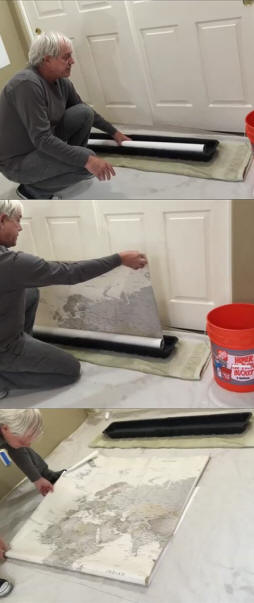
Step 4 - Saturate first panel in wallpaper tray
Determine which is the first panel to install. Mural can be installed from left to right or right to left. Loosely roll the printed wall paper with the printed side facing in and the bottom of the panel wound inside, leaving the top edge exposed.
Completely submerge the rolled wall paper in water for 10 to 15 seconds to activate the adhesive. Remove the roll by pulling the leading edge out of the tray slowly, glue-side up.
Alternately, spray-on wallpaper paste activator can be used instead of dipping the panels in water.
Step 5 - Book the Panels
“Book” the wall paper by laying it on the floor glue-side up, then folding the glue side against itself for approximately 1 minute (avoid creasing the paper when booking)
Note: this product expands slightly in water; for best results, soak and book each panel the same amount of time
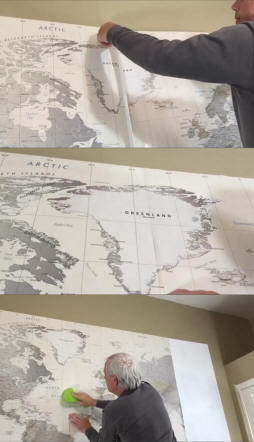
Step 6 - Applying First Panel to Wall
Unfold the top half of the wall paper, leaving the bottom half of the wall paper booked, and position the glue-exposed portion of the top of the wall paper on the wall. Once satisfied with the initial positioning, unfold the wall paper exposing the remaining glue surface. Using a damp sponge or smoothing brush, smooth downward and outward. Start at the center of the panel and smooth toward the edges. When positioning take care not to stretch the panel. Only light brush strokes are necessary when smoothing out the panel, do not apply too much pressure.
Tip: Do not over smooth – bubbles smaller than the size of a U.S. Quarter will dissipate as the wall covering sets
Step 7 - Applying Additional Panels
Follow steps 4-6 for each additional panel.
Each additional panel is installed by aligning it with the previous. Each panel has approximately 1/2 an inch of overlap to make lining things up easier.
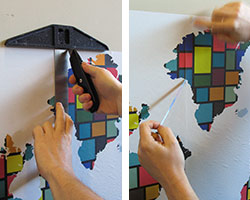
Step 8 - (optional) Seam Roller overlapping panels
This pushes out any excess paste/moisture which can be wiped awaywith the sponge
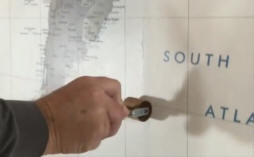
Step 9 - (Optional) Double-cut Overlapping Seams
For a more refined look with less prominent seams you can trim off the excess material that overlaps each panel. This procedure must be done while panels are still wet.
Starting at the top place a straight edge in the middle of where the two panels overlap. Using a sharp razor blade make a single cut through both layers of the overlap. Peel away the outer strip of excess material. Then lift the edge of the panel and remove the remaining excess material from underneath.
Smooth the panels back into place so the edges now butt together.
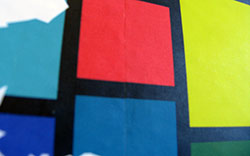
Above: Double-cut Seam
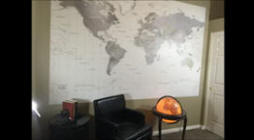
Step 10 - Send Us a Picture
We would love to see an image of your installed mural. Post pictures of your mural on Instagram and be sure to include #worldmapsonline so we see it! We'll share our favorites with our followers!